Home > How to make a helmet
How to make a helmet

Kato Icchu the Second
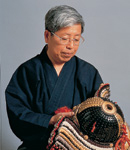
Kato Icchu the Second is the only artisan who is able to create (reproduce)
real armors and helmets based on the Japanese historical evidences. He has learned to make armors and helmets from his father Kato Icchu the First, who repaired numbers of armors and helmets that designated as Japanese national treasures or cultural properties.
Although its size is small, Icchu's armor was made by the same method of the real ones. He is one of ten armor makers in Japan.
Starting with the armors of the Nikko Toshogu Shrine and Minamotono Yoshitsune's armor, Icchu has worked on a lot of repairing and reproducing armors.
- Read the biography of Kato Icchu the Second
Hand made war helmets
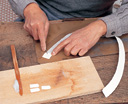
1.Kozane
Kozane is a Japanese word for a small card. It is a small chip of leather or washi (Japanese paper.) Over 500 of Kozane need to be stuck together to make a foundation of the helmet.This part is called "Shikoro".
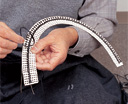
2.Kawa toji
After sticking Kozane, dry them well and drill some holes and tie up the Kozane with thin leather thread.
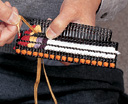
3.Odoshi
Odoshi, which is thick thread made from fabric, is put on Shikoro.
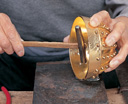
4.Hachi
The parts putting head on is called Hachi. There are two ways to make it. One is that 16 metal molds are lapped over with star studs. Another one is that star studs are knocked into conglobed molds.
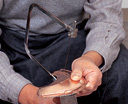
5.making metallic parts
All the metallic parts are hand made because those cannot be mass-produced.
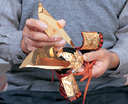
6.the finishing touch
Construct each part. Paste leather inside the helmet.
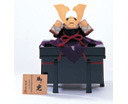
7.accomplished
It takes about 2 weeks to accomplish a helmet.
- All Products
- Home